
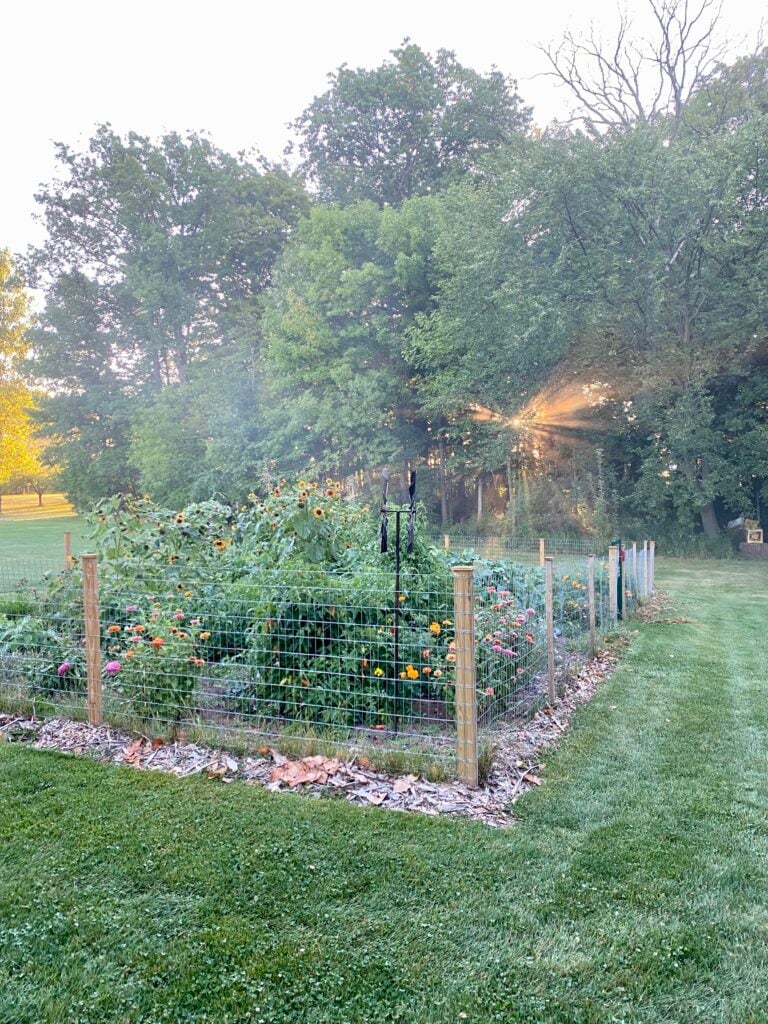
After having a temporary fence around my garden that required set up and take down every fall and spring I finally built a permanent fence. Read along for vegetable garden fence ideas and learn how I built mine.

Vegetable garden fence necessities
If you are building a garden fence to keep both rabbits and deer out of your garden, there are a few things that you need to think about.
First, make sure your fence is at least 4 feet tall to keep the deer out. Secondly, make sure that the space between the wires is small enough so that rabbits will not get in.
My fence is both four feet tall and the spaces between the wires will keep all of the rabbits out. You may want to burry some of the fence in a trench to ensure the rabbits do not burrow underneath.
Materials I used to build my fence
My fence is 52 feet long by 23 feet wide so we bought two roles of 100ft galvanized 2in by 4in fencing. Each corner post of my garden is a treated pine 4x4 that is 6ft long.
I also have two of these 4x4s for the garden gate to hinge on. The supporting posts are 6ft long treated pine 2x4s.

My garden fence gate is a prebuilt steel tube gate that is 4 feet wide. We also used a fence latch that will allow us to to push the gate and it will then latch on its own.
For finishing touches we cut caps for each post. This is not just for looks, but it also protects the posts by keeping water out of the lumber's end-grains. These caps were treated pine fence slats that we cut out on a table saw.
How we built my garden fence
It may surprise you that our entire vegetable garden fence took only one week to build. This was with just two people working on it a few hours an evening. I know it surprised me how quickly we put it up.
I have outlined each and every step we took to build the fence so you can build your own. Also all steps are in the same order that we did them in.
Staking it out
Your first step to building a garden fence should be staking it out. This will ensure that your garden fence is square.
We measured out the length of the garden and then put stakes at the four corners. We also tied twine to each stake so we could line up each post to it.

To make sure that your garden is square measure diagonally. Make sure that the distance is equal between the diagonal posts. Leave these stakes and twine in the ground as they will be extremally crucial when setting the posts.
Setting the posts
After staking, we set the four corner posts and the two fence posts. To do this we dug 2ft deep holes with post hole diggers.
To stay below the frost line and keep the posts from shifting a good rule of thumb is to bury at least two feet or ⅓ of the post length.
We then aligned the posts to the twine so they were square at the corners. Another tool we used to get the posts square and level was a, get this, level.

Next we used quick setting concrete to fill the holes followed by some water. For each hole we poured in one 50lb bag of concrete. We then back filled the rest of the hole with soil.
After setting the 4x4 posts we then moved on to our 2x4 support posts. Each of these posts was 6ft long, so we followed the same process except we only used a half bag of concrete.
Installing the gate
After the posts were cured we moved on to installing the gate. Our tube gate came with the hinge bolts that were required for it to swing. We screwed each hinge into the wood so that the gate could open to at least 90o.

We also screwed on a 2x4 section to the inside of the gate posts. The gate just swings above this 2x4. This prevents the gate from getting caught on the ground and it also keeps it from freezing to the ground in the winter.
Stapling the fence on
Finally we moved onto fencing the garden. For both the top and bottom of my garden the fencing was smooth sailing. Simply stretch the fence and staple it in with the air powered stapler, but as we moved to the sides that is where it got a little tricky.

Since my garden is on a slope we had to dig a trench and do a kind of terraced look with the fence. This was the only way to make sure that the fence was touching the ground, so rabbits could not get in, and make sure that there was no slack in the fencing.

Adding the caps
The garden posts had exposed end-grains so we decided to add some caps to clean it up and to protect the wood from water rot.

These caps are made of treated fence slats that were left over from another project. We cut these on a table saw to be slightly larger than the top of each post.
Then we screwed each one on with two 3 inch screws. I really like the clean and neat look that this gave to the fence. You could even add bird houses to the top of your posts.

What I plan to do next
We got this fence up right before planting time (2023) so I can't wait to make the fence look great with some new landscaping.

I have started to remove 1ft of sod around the entire garden and am replacing this with wood mulching. I may then plant some annual and perennial plants to really make the garden look nice.
2025 Fence Update
It's been two years since we put this fence up and I still love it! It's keeping out all the deer and most rabbits (baby rabbits do get through).
I might add hardware cloth around the bottom foot of the fence to keep little rabbits out, but other than that my fence is great.

It is very sturdy and is not sagging. I have also followed through with my plan to mulch around the outside of the fence and add perennials which will come up this spring!
Pin This!


RM says
Where did you get your gate?
Josiah says
I got this particular gate from a local Tractor Supply Store. If you want one similar to mine, I would check a local feed store or other farm store.
Tara says
Love this! How far apart did you put your posts? Thanks!
Josiah says
Hello Tara,
The posts are spaced 6 feet apart on the long sides and 8 feet apart on the short sides. The posts for the gate are 4 feet apart to perfectly fit the size of our gate. It's really holding up well, so I hope you build one similar!